
Q1. Can I print data on an envelope or postcard?
A1. Yes, you can also print on envelopes and postcards.
Execute a print job on your computer then load envelopes or postcards into this machine to execute a print job on it.
Operation procedure
- Open the file in the application, and click [File]. Then click [Print] from the menu.
- Select this product from [Select Printer] (or [Printer Name]) then click [Preferences] (or [Properties]).
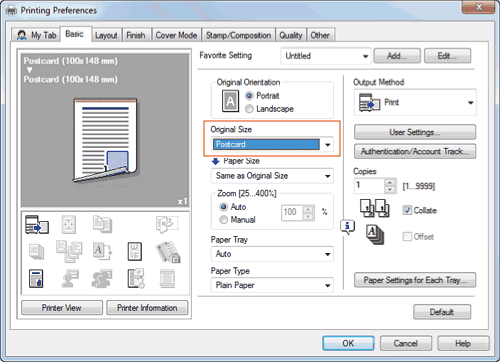
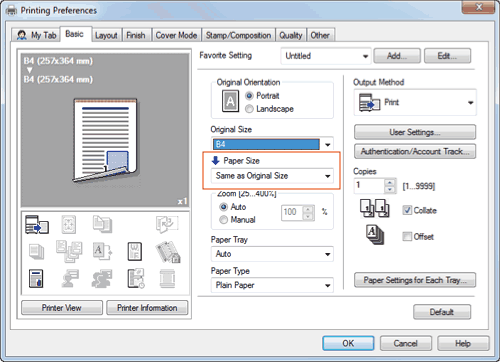
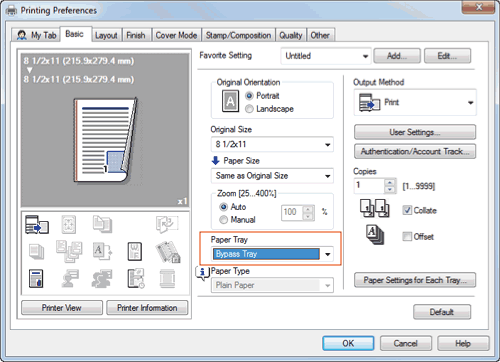
- In [Original Size] on the [Basic] tab, select [Envelope] or [Postcard].
- Various sizes of envelopes are available. Select the correct paper size for the envelopes you have loaded.
- Various sizes of envelopes are available. Select the correct paper size for the envelopes you have loaded.
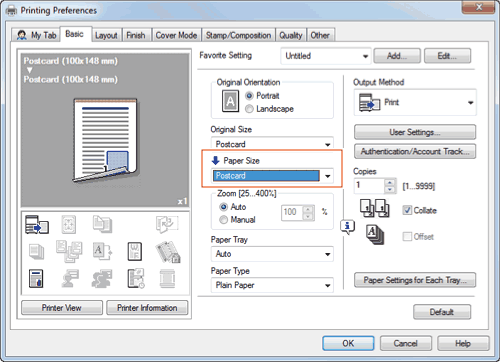
- Select [Envelope] or [Postcard] from [Paper Size].
- Various sizes of envelopes are available. Select the correct paper size for the envelopes you have loaded.
- Various sizes of envelopes are available. Select the correct paper size for the envelopes you have loaded.
- Select [Bypass Tray] from [Paper Tray].

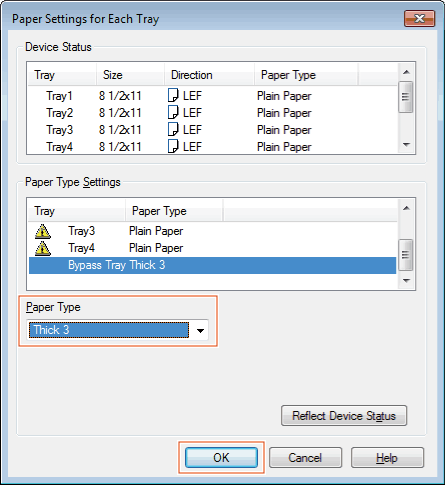
- Click [Paper Settings for Each Tray].

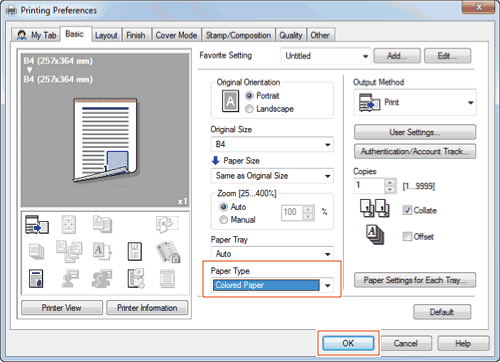
- Select the relevant paper type from [Paper Type] then click [OK].
- To print on postcards, select [Thick 3] or [Thick 3 (Side2)]. To print on envelopes, select [Envelope].
- To print on postcards, select [Thick 3] or [Thick 3 (Side2)]. To print on envelopes, select [Envelope].
- Click [OK].
- Click [Print].
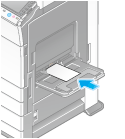
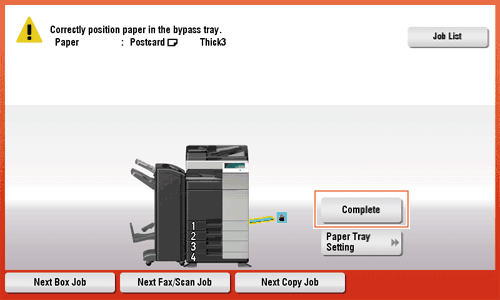
- Load envelopes or postcards into the Bypass Tray with the print side facing down.
- Tap [Complete] on the Control Panel of the machine.
- If [Correctly position paper in the bypass tray.] is displayed while [Complete] is grayed out, remove the envelopes or postcards from the Bypass Tray and load them again.
- If [Correctly position paper in the bypass tray.] is displayed while [Complete] is grayed out, remove the envelopes or postcards from the Bypass Tray and load them again.
Q2. Although user authentication has been successful, the input screen in the driver is grayed out.
A2. In the Properties window of the printer driver, change your user authentication to the correct setting.
How to set
- Open the [Printers] window or [Printers and Faxes] window.
- In Windows XP/Server 2003, click the Start menu, then select [Printers and Faxes].
If [Printers and Faxes] is not displayed on the Start menu in Windows XP/Server 2003, open the Start menu, then click [Control Panel] - [Printers and Other Hardware] - [Printers and Faxes]. When [Control Panel] is displayed in Classic View, double-click [Printers and Faxes]. - In Windows Vista/Server 2008, open the Start menu, then click [Control Panel] - [Hardware and Sound] - [Printers]. When [Control Panel] is displayed in Classic View, double-click [Printers].
- In Windows 7/Server 2008 R2, open the Start menu, then click [Control Panel] - [Hardware and Sound] - [Device and Printer]. When [Control Panel] is displayed in an Classic View, click [Device and Printer].
- In Windows XP/Server 2003, click the Start menu, then select [Printers and Faxes].
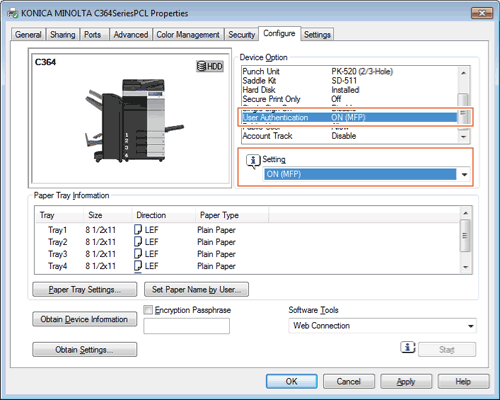
- Right-click the icon of this machine, and click [Properties].
- In Windows 7/Server 2008 R2, click [Printer Properties].
- From [Device Option] on the [Configure] tab, select [User Authentication], then select the authentication status from [Setting].
- The authentication status may be [ON (MFP)], [ON (External Server)], [ON (MFP) + ON (External Server)] or [ON (Enhanced Server)] authentication. For details, contact the administrator of this machine.
- The authentication status may be [ON (MFP)], [ON (External Server)], [ON (MFP) + ON (External Server)] or [ON (Enhanced Server)] authentication. For details, contact the administrator of this machine.
- Click [OK].
Q3. Can I print on custom size paper?
A3. Yes, you can. Specify the bypass tray on the print screen and load custom size paper into the Bypass Tray.
Operation procedure
- Open the file in the application, and click [File]. Then click [Print] from the menu.
- Select this product from [Select Printer] (or [Printer Name]) then click [Preferences] (or [Properties]).
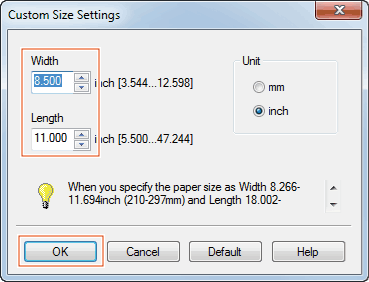
- In [Paper Size] on the [Basic] tab, select [Custom Size].

- Enter the size of the paper you have loaded, then click [OK].
- Select [Bypass Tray] from [Paper Tray].
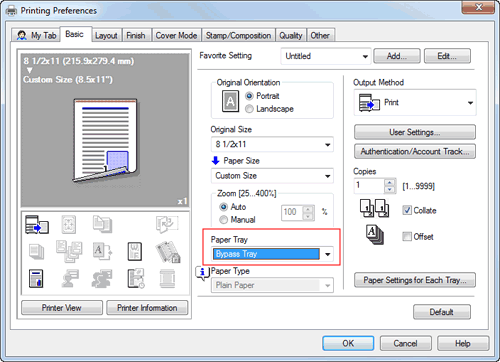
- Click [Paper Settings for Each Tray].
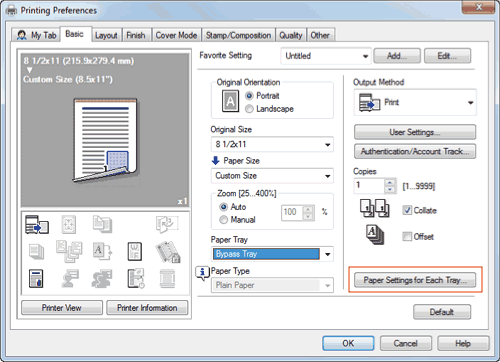
- Select the relevant paper type from [Paper Type], then click [OK].

- Click [OK].
- Click [Print].
- Load custom size paper into the Bypass Tray with the print side facing down.
- Tap [Complete] on the Control Panel of the machine.
Q4. How can I print out highly confidential data without a risk of exposure to others?
A4. You can use either Secure Print or ID & Print.
With the Secure Print function, a password is assigned to the document. Enter the password on the Control Panel of this machine to print the document. The ID & Print function enables printing of a document upon entry of the user name and password registered for user authentication. Enter the user name and password on the Control Panel of this machine to print the document.
Secure Printing is useful for giving permission to a limited number of users that know the password assigned to the document. ID & Print only enables the login user to perform printing.
Tips
- User authentication is a function for limiting access to this machine to registered users. ID & Print can only be used when user authentication is enabled.
Operation procedure: Performing secure print
- Open the file in the application, and click [File]. Then click [Print] from the menu.
- Select this product from [Select Printer] (or [Printer Name]) then click [Preferences] (or [Properties]).
- In [Output Method] on the [Basic] tab, select [Secure Print].
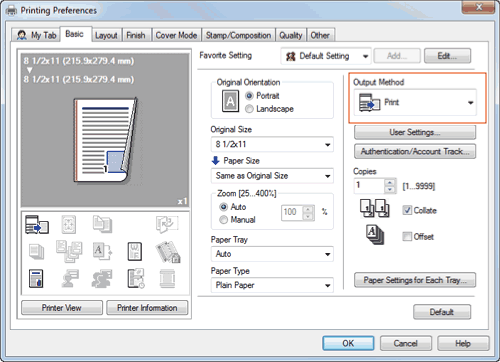
- Enter the [Secure Print ID] and [Password], then click [OK].
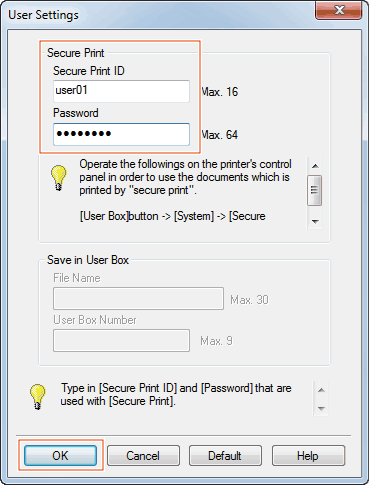
- Click [OK].
- Click [Print].
Operation procedure: Printing a secure document using the Control Panel of this machine
- Tap [Box] and select [Secure Print] from [System].
- Enter the ID and password for the secure print document, then tap [OK].
- Select a secure print document, then tap [Print].
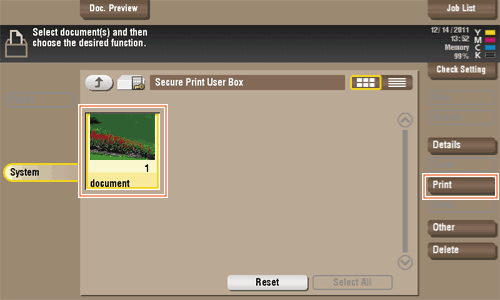
- Change print settings as necessary, and press Start on the Control Panel.
The secure print document is printed and automatically cleared from the Secure Print User Box.
Operation procedure: Performing ID & Print operation
- Open the file in the application, and click [File]. Then click [Print] from the menu.
- Select this product from [Select Printer] (or [Printer Name]) then click [Preferences] (or [Properties]).
- On the [Basic] tab, click [Authentication/Account Track].
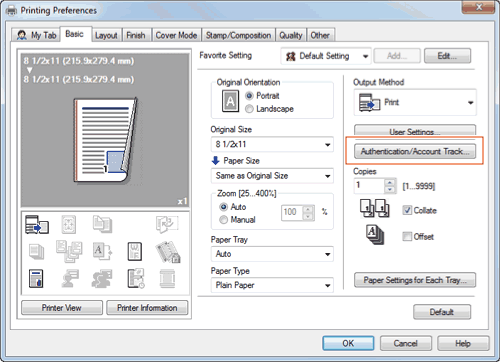
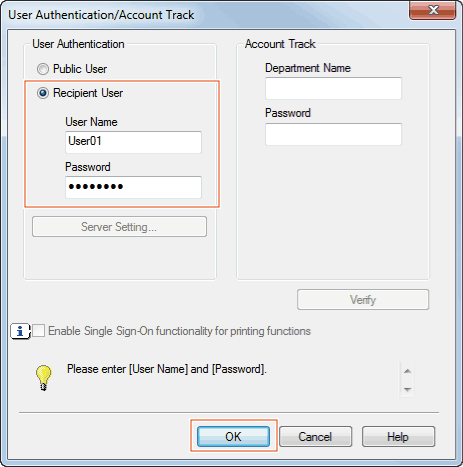
- Select [Recipient User], enter the [User Name] and [Password] that are registered with the machine, then click [OK].
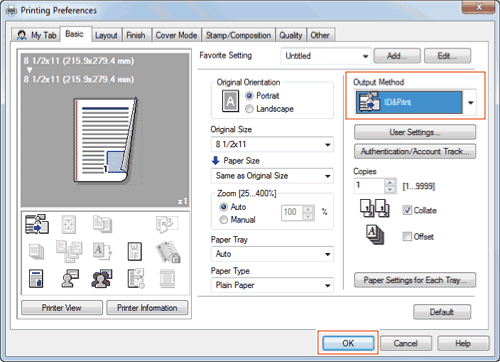
- Select [ID&Print] from [Output Method], then click [OK].
- Click [Print].
Operation procedure: Printing after user authentication on the machine
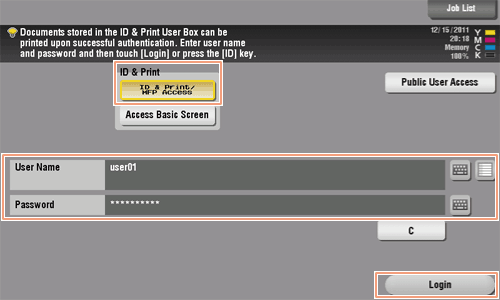
- Select [ID & Print/MFP Access], enter your user name and password, then tap [Login].
After successful user authentication, the file is printed.
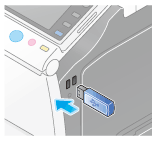
Q5. Can I directly print a file in a USB memory device?
A5. Yes. You can print a file simply by inserting the USB memory into the USB Port of the machine.
See the table below for the types of files that can be printed and the operating conditions of the USB memory.
| Item | Specifications |
|---|---|
Supported standards | USB 2.0 |
File system | FAT32 |
Types of printable files | PDF, Compact PDF, JPEG, TIFF, XPS, Compact XPS, OpenXML (.docx/.xlsx/.pptx), and PPML (.zip) |
Operation procedure
- Insert a USB memory into the USB Port of the machine.
- Tap [Print a document from External Memory.].
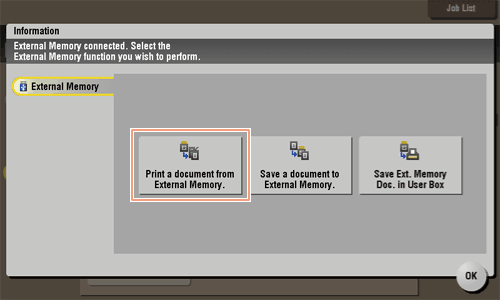
- Select a file to print, then tap [Print].
- Select a folder, then tap [Open] to list documents and folders in the folder. Tap [Top] to return to the location one layer above.

- Select a folder, then tap [Open] to list documents and folders in the folder. Tap [Top] to return to the location one layer above.
- Change the print settings as necessary, and press Start on the Control Panel.

Q6. Characters become garbled when I print. Can I print without garbled characters being produced?
A6. Yes. Try bitmap printing.
Operation procedure
- Open the file in the application, and click [File]. Then click [Print] from the menu.
- Select this product from [Select Printer] (or [Printer Name]) then click [Preferences] (or [Properties]).
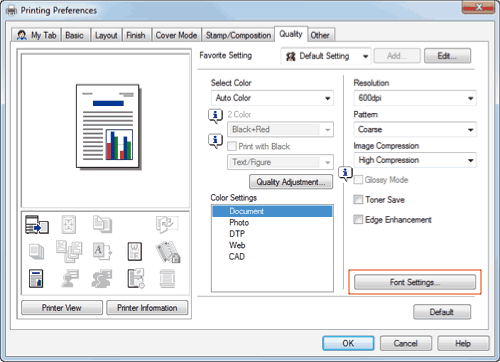
- On the [Quality] tab, click [Font Settings].
- Select [Bitmap] from [Download Font Format], then click [OK].
- You can also eliminate garbled characters by clearing the [Use Printer Fonts] check box.
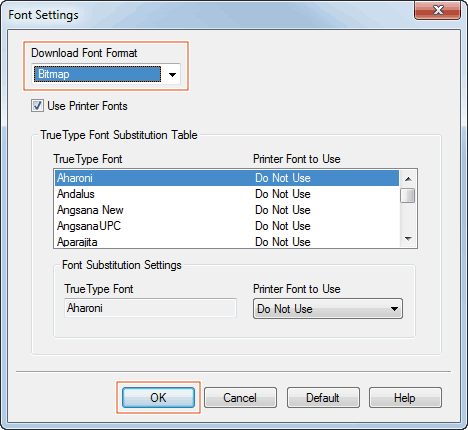
- You can also eliminate garbled characters by clearing the [Use Printer Fonts] check box.
- Click [OK].
- Click [Print].
Q7. How can I print out data as clearly as possible?
A7. Simply select the type of the document to print, and the setting is automatically changed to the optimal for clear printing.
Operation procedure
- Open the file in the application, and click [File]. Then click [Print] from the menu.
- Select this product from [Select Printer] (or [Printer Name]) then click [Preferences] (or [Properties]).
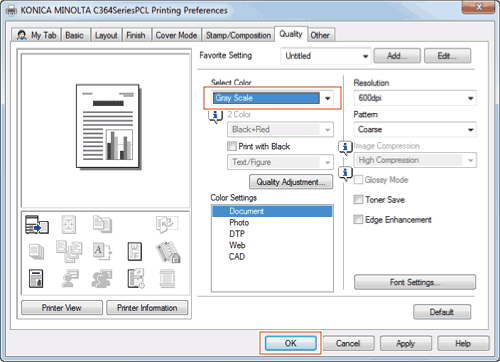
- In [Color Settings] on the [Quality] tab, select the type of the document to print.

- Click [OK].
- Click [Print].
Q8. How can I change the paper size and type settings?
A8. You can change them in the print screen.
Operation procedure
- Open the file in the application, and click [File]. Then click [Print] from the menu.
- Select this product from [Select Printer] (or [Printer Name]) then click [Preferences] (or [Properties]).
- In [Paper Size] on the [Basic] tab, select the correct paper size.
- Select the relevant paper type from [Paper Type], then click [OK].
- Click [Print].
Q9. Can printing be restricted by user?
A9. Yes. You can set user authentication to restrict printing by user. That enables output control by user, leading to cost reductions.
How to set
- Tap [Utility], then select [Administrator Settings].
- Enter the password, then tap [OK].
- Select [User Authentication/Account Track] - [General Settings] - [User Authentication].
- Select [Authenticate], select an authentication method, then tap [OK].
- The authentication status may be [ON (MFP)], [External Server Authentication], [Main + External Server] or [ON (Enhanced Server)] authentication. For information on server-based user authentication, contact the server administrator.
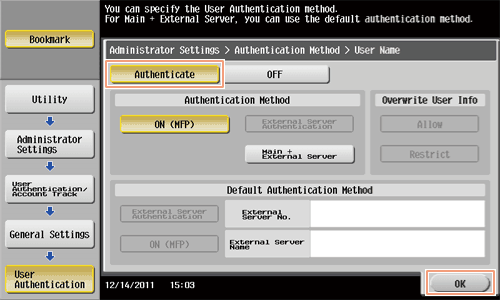
- The authentication status may be [ON (MFP)], [External Server Authentication], [Main + External Server] or [ON (Enhanced Server)] authentication. For information on server-based user authentication, contact the server administrator.
- Tap [OK].
- Select [Yes], then tap [OK].
- Select [User Authentication Settings] - [User Registration].
- Select the registration number of a target user, then tap [Edit].

- Enter the user name and password in [User Name] and [Password].
- If you have selected a registered user in Step 8, no information has to be entered.

- If you have selected a registered user in Step 8, no information has to be entered.
- Tap [Max. Allowance Set] and [Color] or [Black], then enter the maximum allowance for the number of color/black originals that the user can print, using the Keypad.
- To manage the upper limit without distinguishing between the color and black originals, tap [Total Allowance]. Then, tap [Total], enter the upper limit using the keypad, and press [OK].
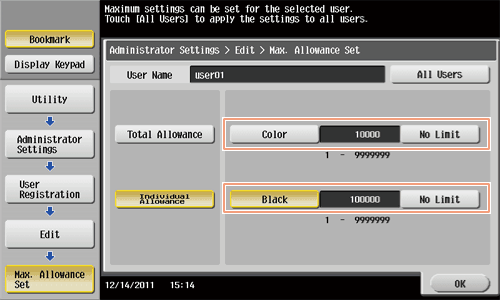
- To manage the upper limit without distinguishing between the color and black originals, tap [Total Allowance]. Then, tap [Total], enter the upper limit using the keypad, and press [OK].
- Tap [OK].
- Tap [Function Permission] to set the limit for the respective functions.
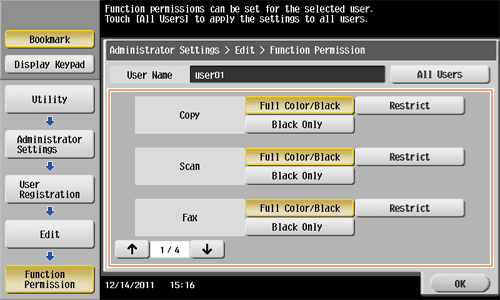
Settings Description [Copy]Specify whether to allow a copy job.[Scan]Specify whether to allow a scan job.[Fax]Specify whether to allow a fax job.[Print]Specify whether to allow a print job for a file.[User Box]Specify whether to allow any operation of a file saved in the User Box.[Print Scan/Fax TX]Specify whether to allow a print job for a file to send.[Save to External Memory]Specify whether to permit saving of files to an external memory.[External Memory Document Scan]Specify whether to allow scanning of files saved in the User Box.[Manual Destination Input]Specify whether to allow manual input of a destination.[Cellular Phone/PDA]Specify whether to allow transferring of files from Bluetooth devices to this machine.[Web Browser]Specify whether to allow use of the Web browser. - Tap [OK].
- Tap [OK].
Q10. Are there any paper-saving printing methods?
A10. You can save paper by printing more than one original page onto the same side of a single sheet of paper or printing on both sides of sheets of paper.
Operation procedure
- Open the file in the application, and click [File]. Then click [Print] from the menu.
- Select this product from [Select Printer] (or [Printer Name]) then click [Preferences] (or [Properties]).
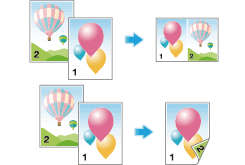
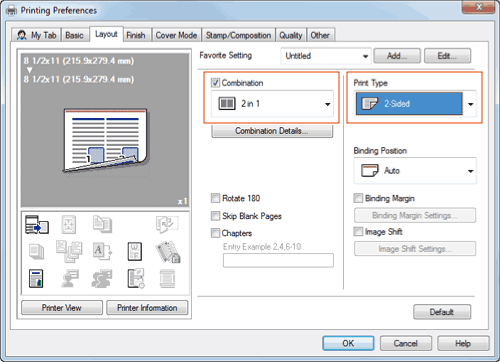
- To print more than one original page onto the same side of a single sheet, select the [Combination] check box on the [Layout] tab to select a page combination format. To print on both sides of the paper, select [2-Sided] from [Print Type] on the [Layout] tab.
- Click [OK].
- Click [Print].
Q11. Can the printing position be adjusted?
A11. You can shift and adjust the position of the entire print image by setting the binding margin or image shift.
Page Margin
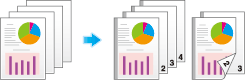
Image Shift

Operation procedure
- Open the file in the application, and click [File]. Then click [Print] from the menu.
- Select this product from [Select Printer] (or [Printer Name]) then click [Preferences] (or [Properties]).
- To configure the page margin, select the [Binding Margin] check box on the [Layout] tab and click [Binding Margin Settings].
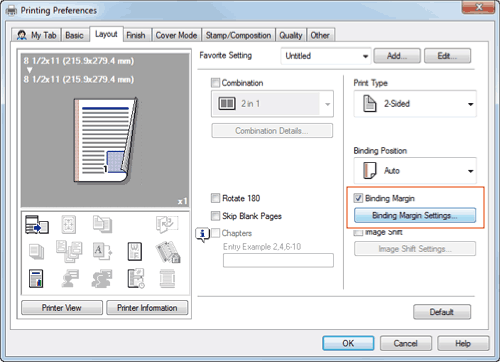
- Configure the respective items for page margins, then click [OK].
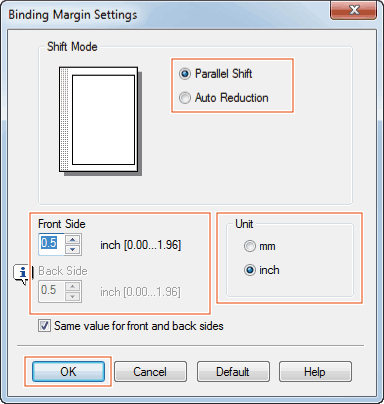
Settings Description [Shift Mode]Select how to process the image to prepare the page margin.[Front Side]/[Back Side]Enter the width of the page margin. For 2-sided printing, clearing the [Same value for front and back sides] check box allows you to specify different values for the front and back sides.[Unit]Select the unit for the value to set. - To enable image shift, select the [Image Shift] check box on the [Layout] tab and click [Image Shift Settings].
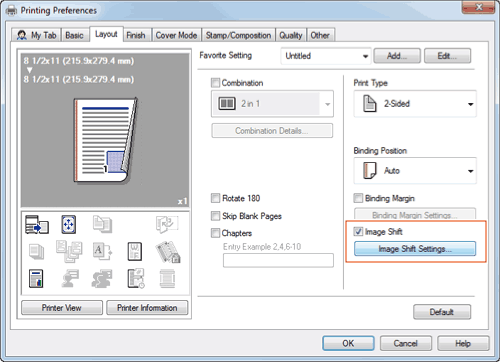
- Configure the respective items for image shift, then click [OK].
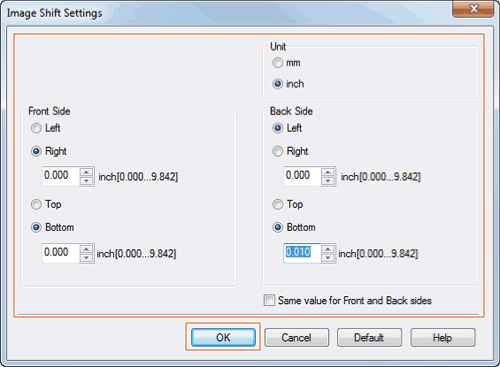
Settings Description [Unit]Select the unit for the value to set.[Front Side]/[Back Side]Set the direction and the value for shifting the printing position. For 2-sided printing, select the [Same value for Front and Back sides] check box allows you to specify the same value for the front and back sides. - Click [OK].
- Click [Print].
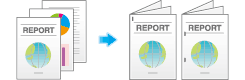
Q12. What types are available for printing finish?
A12. Various finish modes are available according to the options installed on this machine, such as stapling, punching and binding.
Staple
Stapling is enabled to bind at a corner or at two positions. This method is useful for printing handout material among other things.
Tips
- The Finisher is required to use the Staple function.
Punch
Punching is enabled for filing holes.

Tips
- To use the Punch function:
- The Finisher FS-534 and Punch Kit PK-520 or the Finisher FS-533 and Punch Kit PK-519 are required.
- The Finisher FS-535 and Punch Kit PK-521 or the Z Folding Unit ZU-606 are required (only for bizhub C554).
Center Staple & Fold
Center stapling is enabled for booklet-like finish.
Tips
- To use the Center Staple & Fold function:
- The Finisher FS-534 and Saddle Stitcher SD-511 are required.
- The Finisher FS-535 and Saddle Stitcher SD-512 are required (only for bizhub C554).
Fold
Half-folding, tri-folding, or Z-folding is enabled. This function is useful for direct mail and information notes.

Tips
- To use the Half-Fold or Tri-Fold function:
- The Finisher FS-534 and Saddle Stitcher SD-511 are required.
- The Finisher FS-535 and Saddle Stitcher SD-512 are required (only for bizhub C554).
- To use the Z-Fold function:
- The Finisher FS-535 and Z Folding Unit ZU-606 are required (only for bizhub C554).
Operation procedure
- Open the file in the application, and click [File]. Then click [Print] from the menu.
- Select this product from [Select Printer] (or [Printer Name]) then click [Preferences] (or [Properties]).
- Select the check box for the desired finish on the [Finish] tab. If you have selected the [Staple], [Punch] or [Fold] check box, specify the quantity, positions and other necessary settings.
- The number of punched holes varies depending on the country you are in.
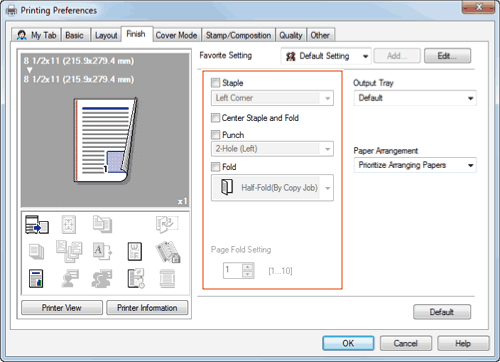
- The number of punched holes varies depending on the country you are in.
- Click [OK].
- Click [Print].
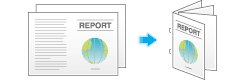
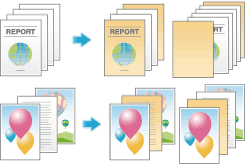
Q13. Can I print the cover and chapter cover on a different type of paper?
A13. Yes. You can specify a different paper tray for the cover or the chapter cover for printing them on a different type of paper.
Operation procedure
- Open the file in the application, and click [File]. Then click [Print] from the menu.
- Select this product from [Select Printer] (or [Printer Name]) then click [Preferences] (or [Properties]).
- In [Paper Tray] on the [Basic] tab, select one other than [Auto].
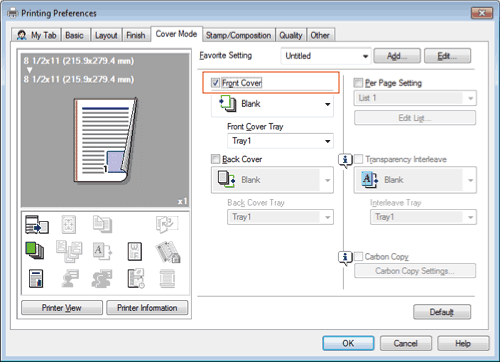
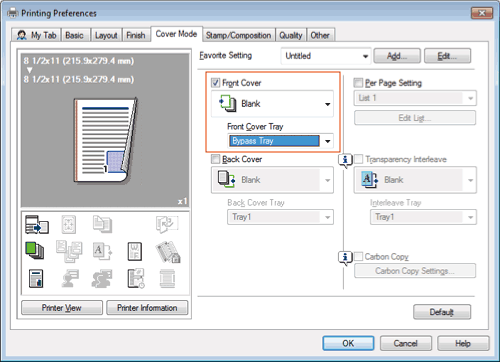
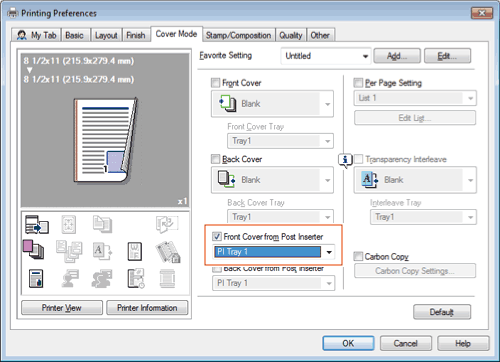
- To print a front cover on a different type of paper, select the [Front Cover] check box on the [Cover Mode] tab.
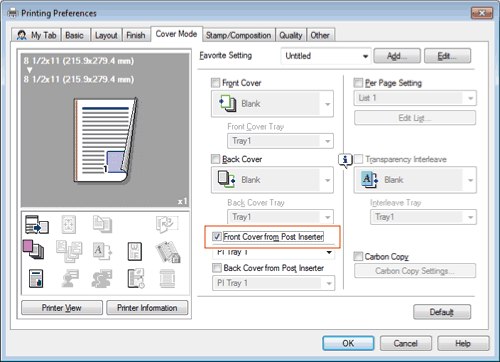
- The [Front Cover from Post Inserter] check box can also be selected when the Finisher FS-535 and Post Inserter are installed in bizhub C554.
- The [Front Cover] and [Front Cover from Post Inserter] check boxes cannot be selected at the same time.
- Select [Blank] or [Print] from the [Front Cover] pull-down menu, then select a paper tray from the [Front Cover Tray] pull-down menu.
- If you select the [Front Cover from Post Inserter] check box in Step 4, check that paper is loaded into the Post Inserter, then select a paper tray.
- If you select the [Front Cover from Post Inserter] check box in Step 4, check that paper is loaded into the Post Inserter, then select a paper tray.
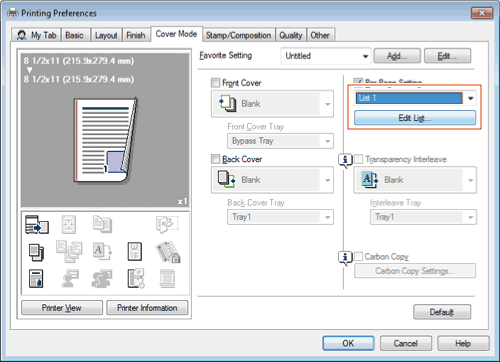
- To print chapter covers on a different type of paper, select the [Per Page Setting] check box on the [Cover Mode] tab.
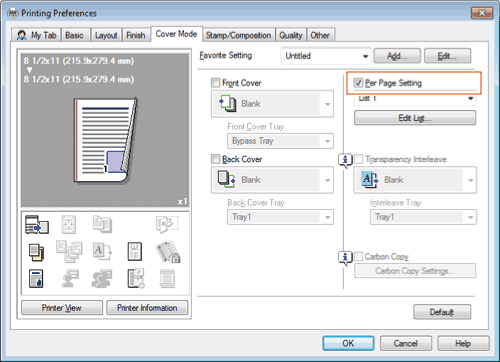
- Select a list number and click [Edit List…].
- Click [Add] and enter the page number(s) for chapter cover(s) in [Page Number].
- To print more than one chapter cover, separate the page numbers with commas.
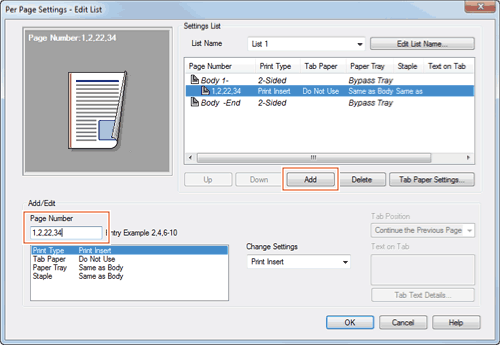
- To print more than one chapter cover, separate the page numbers with commas.
- Select [Paper Tray] and select a paper tray from [Change Settings].
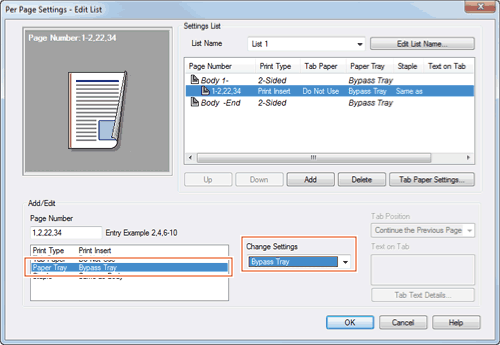
- Click [OK].
- Click [OK].
- Click [Print].
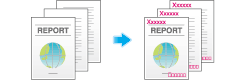
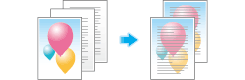
Q14. Can I print characters and images so as to have them overlapped?
A14. Yes, you can print with a watermark (text stamp) or a header/footer.
Also, an overlay function is provided that enables printing over an output from a file saved on a computer.
Watermark
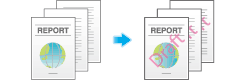
Header/Footer
Overlay
Operation procedure: Printing with a watermark
Use this function to apply a mark of a confidential or critical document for copyright protection or indication of the importance of the document.
- Open the file in the application, and click [File]. Then click [Print] from the menu.
- Select this product from [Select Printer] (or [Printer Name]) then click [Preferences] (or [Properties]).
- On the [Stamp/Composition] tab, select the [Watermark] check box, then select a watermark.
- Click [Edit] to replace the watermark with another or to create a new one.
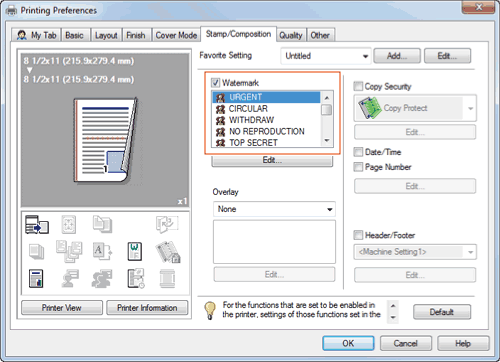
- Click [Edit] to replace the watermark with another or to create a new one.
- Click [OK].
- Click [Print].
Operation procedure: Printing with a header/footer
Use this function to add a title of the document at the head of each page or to print with page numbers at the bottom.
- Open the file in the application, and click [File]. Then click [Print] from the menu.
- Select this product from [Select Printer] (or [Printer Name]) then click [Preferences] (or [Properties]).
- On the [Stamp/Composition] tab, select the [Header/Footer] check box, then select information to print out.
- Click [Edit] to set the starting page and color for printing the header/footer.
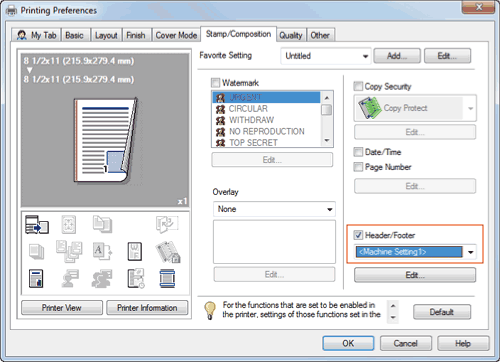
- Click [Edit] to set the starting page and color for printing the header/footer.
- Click [OK].
- Click [Print].
Operation procedure: Performing overlay print
Use this function to print by adding ruling for slips and forms or the corporate logo.
- Before the overlay function can be enabled, a file for overlay printing must be created on the computer.
- Open the file in the application, and click [File]. Then click [Print] from the menu.
- Select this product from [Select Printer] (or [Printer Name]) then click [Preferences] (or [Properties]).
- To print a document over an output of a file created on a computer, select [Print Host Image] from [Overlay] on the [Stamp/Composition] tab, then select the file for overlay printing.
- Click [Edit] to specify the page and position for overlay printing.
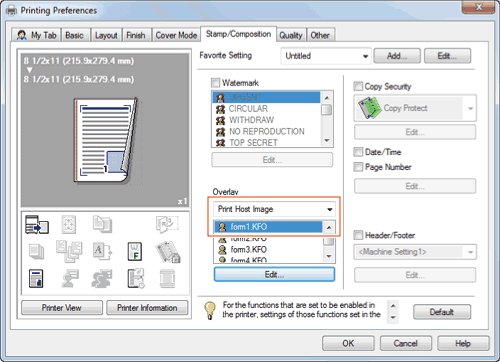
- Click [Edit] to specify the page and position for overlay printing.
- Click [OK].
- Click [Print].
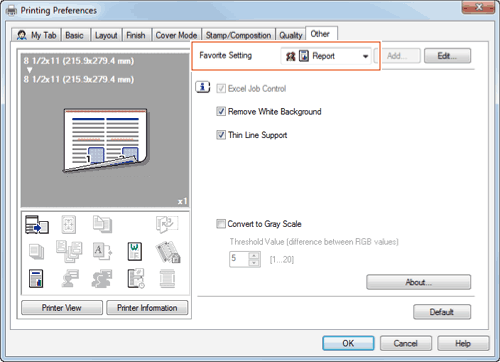
Q15. Can I customize the print settings window?
A15. Yes. You can easily customize the window from the properties window of the printer driver by registering frequently used functions en masse on My Tab or registering settings for respective tabs as your favorite for quick activation.
How to set: Registering functions on My Tab
- Open the file in the application, and click [File]. Then click [Print] from the menu.
- Select this product from [Select Printer] (or [Printer Name]) then click [Preferences] (or [Properties]).
- Click [Edit My Tab…].
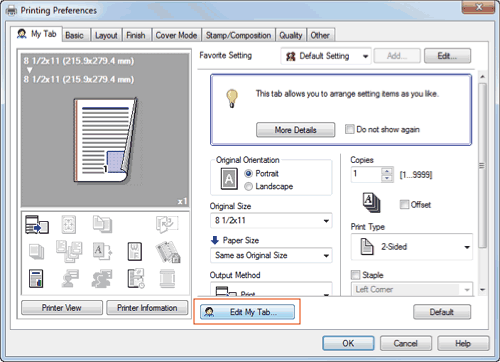
- To register functions on My Tab, select the functions to register from [Setting Item List] and click [to the LEFT] or [to the RIGHT].
 appears for the functions registered on the left side of My Tab and
  appears for those registered on the right.
- To rearrange functions registered on My Tab, select the function you want to relocate on [My Tab] and click [Up], [Down], or [Left/Right].
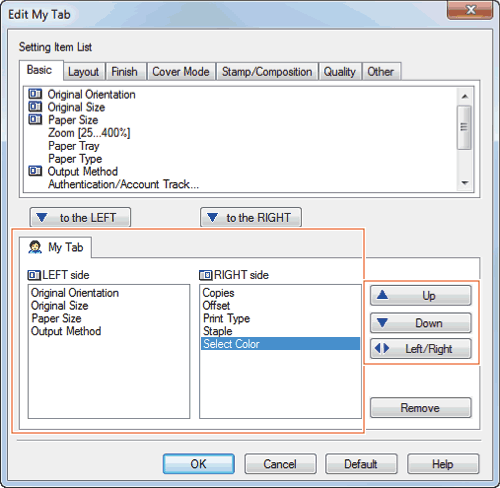
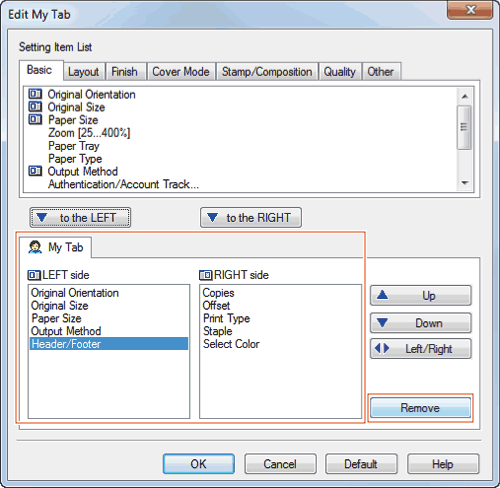
- To delete a function registered on My Tab, select the function to delete on [My Tab] and click [Remove].
- Click [OK].
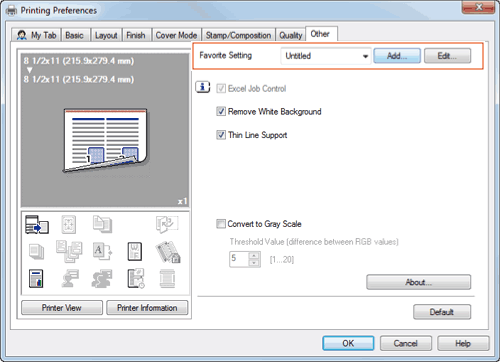
How to set: Registering the settings on the properties window as favorites
- Configure functions on the respective tabs on the properties window.
- Click [Favorite Setting] next to the [Add] box.
- Configure the respective items for the favorite settings, then click [OK].
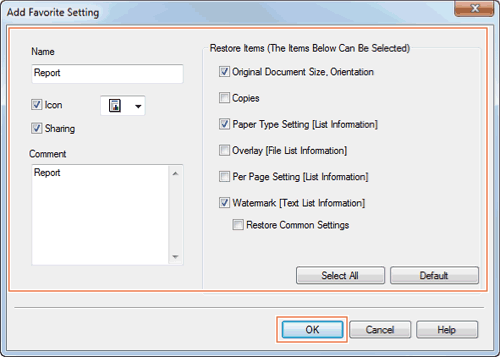
Settings Description [Name]Enter the name of the favorite setting.[Icon]Select an icon to display in the Favorite Setting list.[Sharing]Set whether to share the favorite setting.[Comment]Enter description for the favorite setting.[Restore Items]Select the box of each item to be reflected on the settings on the properties window when the favorite setting is restored.
How to set: Restoring a favorite setting that has been registered
- Select a registered favorite setting from [Favorite Setting] on the properties window.
- To edit the contents of a registered favorite setting, select the target favorite setting from [Favorite Setting] and click [Edit].
- You cannot edit the contents of pre-registered favorite settings.
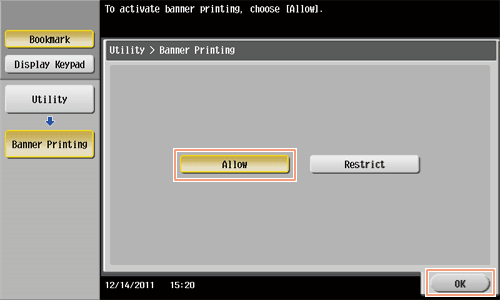
Q16. Can I print on very long sheets of paper such as a banner?
A16. Yes, you can print on a banner or other long sheet of paper by using the Banner Printing function.
The paper types below can be used for banner printing.
| Paper width | Paper length | Paper weight |
|---|---|---|
8-1/4 to 11-11/16 inches (210 to 297 mm) | 18 to 47-1/4 inches (457.3 to 1200 mm) | 33-13/16 to 55-7/8 lb (127 g/m2 to 210 g/m2) |
Tips
- When loading long sheets of paper, mount the Mount Kit MK-730 for long paper.
How to set
- Tap [Utility] and select [Banner Printing].
- Select [Allow], then tap [OK].
- Check that the screen waiting for banner printing job has appeared.
- If a job is received for printing on a sheet of paper other than a non-banner size while the machine is waiting to print on a banner, that job is discarded.
- If a job is received for printing on a sheet of paper other than a non-banner size while the machine is waiting to print on a banner, that job is discarded.
- Open the file in the application, and click [File]. Then click [Print] from the menu.
- Select this product from [Select Printer] (or [Printer Name]) then click [Preferences] (or [Properties]).
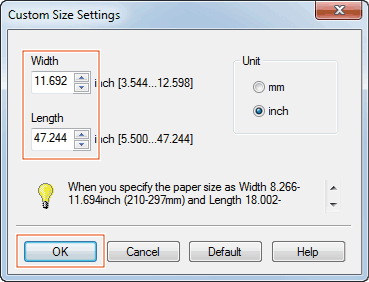
- In [Original Size] or [Paper Size] on the [Basic] tab, select [Custom Size].
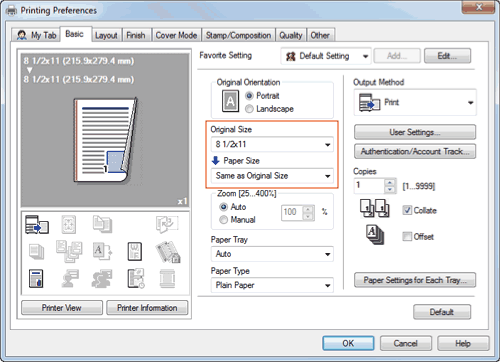
- Enter values for [Width] and [Length] of the paper for printing, then click [OK].
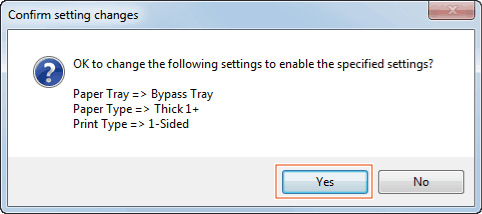
- Check the paper tray and paper type settings automatically changed, then click [Yes].
- Click [OK].
- Click [Print].
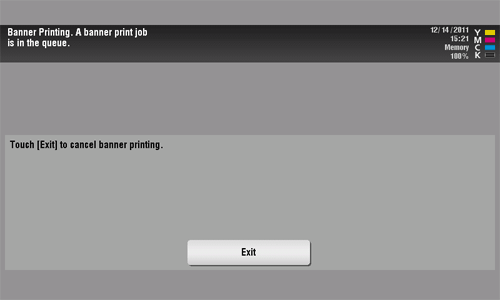
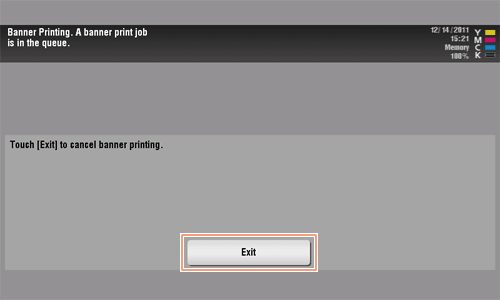
- Load paper for banner printing with the print side face down then tap [Complete].
Printing on the banner paper starts. Support the ejected banner paper by hand.
- To continue banner printing, execute printing from the computer.

- To continue banner printing, execute printing from the computer.
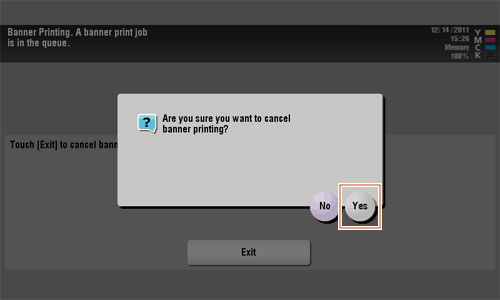
- Tap [Exit].
- Tap [Yes].
Q17. Is it possible to configure so that black-and-white printing is always enabled?
A17. Yes, you can keep black-and-white printing always enabled by changing the initial value of the printer driver.
Tips
- Not only for black-and-white printing, but also the initial values of other functions frequently used can be edited so that you do not have to configure settings each time you print.
- Setting black-and-white printing and 2-sided printing as initial values helps save toner and paper.
Operation procedure
- Open the [Printers] window or [Printers and Faxes] window.
- In Windows XP/Server 2003, click the Start menu, then select [Printers and Faxes].
If [Printers and Faxes] is not displayed on the Start menu in Windows XP/Server 2003, open the Start menu, then click [Control Panel] - [Printers and Other Hardware] - [Printers and Faxes]. When [Control Panel] is displayed in Classic View, double-click [Printers and Faxes]. - In Windows Vista/Server 2008, open the Start menu, then click [Control Panel] - [Hardware and Sound] - [Printers]. When [Control Panel] is displayed in Classic View, double-click [Printers].
- In Windows 7/Server 2008 R2, open the Start menu, then click [Control Panel] - [Hardware and Sound] - [Device and Printer]. When [Control Panel] is displayed in an Classic View, click [Device and Printer].
- In Windows XP/Server 2003, click the Start menu, then select [Printers and Faxes].
- Right-click the icon of this machine, and click [Properties].
- In Windows 7/Server 2008 R2, click [Printer Properties].
- In the [General] tab, click [Printing Preferences].
- In Windows 7/Server 2008 R2, click [Basic].
- Select [Gray Scale] from [Select Color] on the [Quality] tab, then click [OK].
- Click [OK].
The gray scale setting will be applied whenever the printer is used in any application software.