User's Guide

Checking the Name and Function of Each Part in This Machine (bizhub C554/C454)
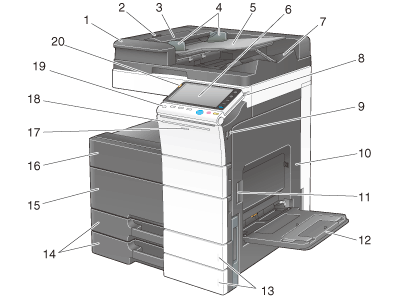
Front side
| No. | Name | Description |
|---|---|---|
1 | Dual Scan Document Feeder | Automatically feeds and scans originals by page. This unit scans a 2-sided original by only requiring the paper be fed into the machine once without reversing. This unit is referred to as ADF in the manual. |
2 | Left Cover Release Lever | Used to open the Left Cover. |
3 | Left Cover | Open the Left Cover when clearing a paper jam. |
4 | Lateral Guide | Adjust this guide along the width of the original. |
5 | Original Tray | Load the original face up in this tray. Open the Original Tray when clearing a paper jam in the ADF. |
6 | Control Panel | Used to configure various settings in this machine. |
7 | Original Output Tray | The scanned original is fed out onto this tray. |
8 | Stylus Pen | Used to select a menu on the Touch Panel, or enter characters. |
9 | USB Port (Type A) USB2.0/1.1 | Used to connect an external memory unit (USB memory unit) to this machine. |
10 | Right Door | Open this door to clear a paper jam. |
11 | Right Door Release Lever | Used to lock the Right Door. |
12 | Bypass Tray | Use this tray to print or copy on irregularly size paper, transparencies, postcards (4  6 (A6 Card)), envelopes, or label sheets. 6 (A6 Card)), envelopes, or label sheets.The Bypass Tray can hold up to 150 sheets of plain paper, 20 sheets of Thick 1, 20 sheets of Thick 1+, 20 sheets of Thick 2, 20 sheets of Thick 3, 20 sheets of Thick 4, 20 sheets of transparency, 20 sheets of postcards (4 6 (A6 Card)), label sheets, or index paper, and 10 sheets of envelopes or banner paper. |
13 | Paper-Empty Indicator | Flashes in orange when a tray runs low on paper, and lights up when a paper-out occurs. |
14 | Tray1, Tray2 | Allows you to load up to 500 sheets. These trays can hold up to 150 sheets respectively of Thick 1, Thick 1+, Thick 2, and Thick 3. |
15 | Lower Front Door | Open this door to replace the Waste Toner Box or Imaging Unit, and to clean the Print Head Glass. |
16 | Upper Front Door | Open this door to replace a Toner Cartridge. |
17 | Data Indicator | Flashes in blue while this machine is receiving a job. If a job is currently spooled, this indicator lamp lights up blue. |
18 | Status Indicator (Printing indicator) | Flashes in white during normal printing. |
19 | Power key | Press this key to switch to Power Save mode. When the power is turned off, the machine is placed into the power save mode, and the LED of the Power key lights orange. |
20 | Status Indicator (Warning or stop indicator) | Indicates the status of this machine by flashing or lighting up. Flash in orange: Warning Lights up orange: The machine has stopped. |
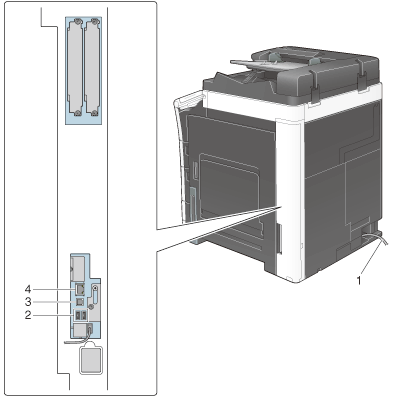
Rear side
| No. | Name | Description |
|---|---|---|
1 | Power Cord | Used to supply power to this machine. |
2 | USB Port (Type A) USB2.0/1.1 | Used to connect Authentication Unit AU-102 or Authentication Unit AU-201. |
3 | USB Port (Type B) USB2.0/1.1 | Connect to this port when using this machine as a USB-connected printer. |
4 | Network Connector (10Base-T/100Base-TX/1000Base-T) | Connect to this port when using this machine as a network printer or network scanner. |
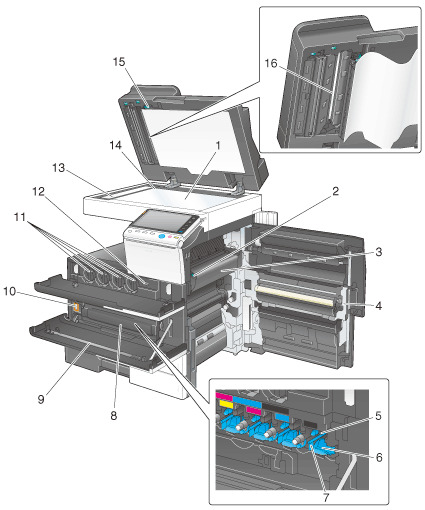
Inside
| No. | Name | Description |
|---|---|---|
1 | Original Glass | Used to load the original. |
2 | Fusing Unit Cover Lever | Open this lever when clearing a paper jam in the fusing unit. |
3 | Fusing Unit | Used to fuse toner to paper using heat and pressure. |
4 | Auto Duplex Unit | Used to reverse paper when performing 2-sided printing. |
5 | Drum Unit | Used to create a print image. |
6 | Lock Release Tab | Used to remove the Drum Unit. |
7 | Charger Cleaner | Used to clean the Electrostatic Charger Wire when an image error occurs. |
8 | Waste Toner Box | Used to collect used waste toners. |
9 | Printhead Cleaner | Used to clean the surface of the Print Head Glass when the Drum Unit is being replaced. |
10 | Main Power Switch | Press this switch to turn the machine on or off. |
11 | Toner Cartridge | This machine provides Toner Cartridge in four colors: cyan (C), magenta (M), yellow (Y), and black (K). A full-color image is created by combining the four toner colors. |
12 | Total Counter | Counter the number of printed pages to date. |
13 | Slit Scan Glass | Used to scan an original image when using the ADF. |
14 | Original Scale | Load the original along this scale. This scale is also used to measure the size of the loaded original. |
15 | Opening and Closing Guide | Lever that locks the guide to scan the back side of an original. Open this guide when clearing a paper jam or cleaning the Slit Scan Glass (back). |
16 | Slit Scan Glass (back) | Used to scan the back side of an original when using the ADF. |