Address Book
Registering a frequently used destination on this machine will save you the trouble of having to enter it each time you send data. A destination registered on this machine is called an "Address Book".
You can register up to 2000 one-touch destinations in the address book. The destination types that can be registered are E-mail address, computer name, etc. depending on the transmission mode.
The Hard Disk is optional in some areas. If the Hard Disk is not installed, up to 1000 destinations can be registered in the address book.
 Tips
Tips Select whether to allow the user to register or change destinations (default: [Allow]). For details, refer to [Registering and Changing Addresses] .
Registering from the Utility
Registering an E-mail address
Register destination E-mail addresses.
Tap [Utility] - [One-Touch/User Box Registration] - [Create One-Touch Destination] - [Address Book (Public)] - [E-Mail] - [New].
 The administrator can perform the same actions by selecting [Administrator Settings] - [One-Touch/User Box Registration].

Enter destination information, then tap [OK].
For details on registration information, refer to [E-Mail] .
Tips- To check the settings for a registered destination, select its registered name, then tap [Check Job Set.].
- To change the settings for a registered destination, select its registered name, then tap [Edit].
- To delete a registered destination, select its registered name, then tap [Delete].
 Reference
- You can also register an E-mail address using Web Connection. For details, refer to [Registering E-mail Address] .
Registering an SMB destination
Register a destination computer name (host name) or IP address. Also register a folder for saving a file or information for accessing a folder.
Tap [Utility] - [One-Touch/User Box Registration] - [Create One-Touch Destination] - [Address Book (Public)] - [PC (SMB)] - [New].
The administrator can perform the same actions by selecting [Administrator Settings] - [One-Touch/User Box Registration].


Enter destination information, then tap [OK].
For details on registration information, refer to [PC (SMB)] .
Tips- To check the settings for a registered destination, select its registered name, then tap [Check Job Set.].
- To change the settings for a registered destination, select its registered name, then tap [Edit].
- To delete a registered destination, select its registered name, then tap [Delete].
 Related setting (for the administrator)
- When you register a SMB destination in the single sign-on environment, a screen appears to prompt you to select whether to include the authentication information in the SMB destination registration information when logging in to this machine depending on the [Edit SMB User Credentials] setting. For details on the [Edit SMB User Credentials] setting, refer to [Client Settings] .
Reference- You can also register an SMB destination using Web Connection. For details, refer to [Registering an SMB Destination] .
Registering an FTP destination
Register destination FTP server host names or IP addresses. Also register a folder for saving a file or account information.
Tap [Utility] - [One-Touch/User Box Registration] - [Create One-Touch Destination] - [Address Book (Public)] - [FTP] - [New].
The administrator can perform the same actions by selecting [Administrator Settings] - [One-Touch/User Box Registration].


Enter destination information, then tap [OK].
For details on registration information, refer to [FTP] .
Tips- To check the settings for a registered destination, select its registered name, then tap [Check Job Set.].
- To change the settings for a registered destination, select its registered name, then tap [Edit].
- To delete a registered destination, select its registered name, then tap [Delete].
Reference- You can also register an FTP destination using Web Connection. For details, refer to [Registering an FTP Destination] .
Registering a WebDAV destination
Register destination WebDAV server host names or IP addresses. Also register a folder for saving a file or account information.
Tap [Utility] - [One-Touch/User Box Registration] - [Create One-Touch Destination] - [Address Book (Public)] - [WebDAV] - [New].
The administrator can perform the same actions by selecting [Administrator Settings] - [One-Touch/User Box Registration].
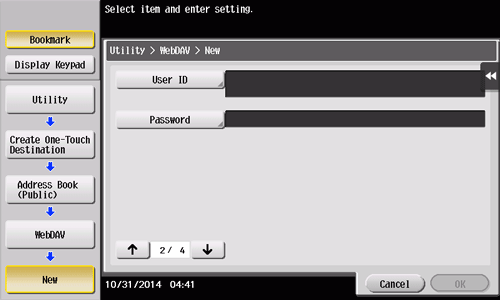


Enter destination information, then tap [OK].
For details on registration information, refer to [WebDAV] .
Tips- To check the settings for a registered destination, select its registered name, then tap [Check Job Set.].
- To change the settings for a registered destination, select its registered name, then tap [Edit].
- To delete a registered destination, select its registered name, then tap [Delete].
Reference- You can also register a WebDAV destination using Web Connection. For details, refer to [Registering a WebDAV Destination] .
Registering a User Box destination
Register user boxes to save.
 Register a User Box before registering its destination. For details, refer to [Create User Box] .
The Hard Disk is optional in some areas. To use this function, the optional Hard Disk is required.
Tap [Utility] - [One-Touch/User Box Registration] - [Create One-Touch Destination] - [Address Book (Public)] - [User Box] - [New].
The administrator can perform the same actions by selecting [Administrator Settings] - [One-Touch/User Box Registration].

Enter destination information, then tap [OK].
For details on registration information, refer to [User Box] .
Tips- To check the settings for a registered destination, select its registered name, then tap [Check Job Set.].
- To change the settings for a registered destination, select its registered name, then tap [Edit].
- To delete a registered destination, select its registered name, then tap [Delete].
Reference- You can also register a User Box destination using Web Connection. For details, refer to [Registering a User Box] .
Registering from Address Book
Registering an E-mail address
Register destination E-mail addresses.
Tap [Address book] on the main menu.

Tap [New].

Select [E-mail] from [Address Type].
Enter destination information, then tap [Register].
The registered information is the same as that to be registered from the Utility. For details, refer to [E-Mail] .
Tips- To check the settings for a registered destination, select its registered name, then tap [Check Job Setting].
- To change the settings for a registered destination, select its registered name, then tap [Edit].
- To delete a registered destination, select its registered name, then tap [Delete].
Reference- You can also register an E-mail address using Web Connection. For details, refer to [Registering E-mail Address] .
Registering an SMB destination
Register a destination computer name (host name) or IP address. Also register a folder for saving a file or information for accessing a folder.
Tap [Address book] on the main menu.
Tap [New].
Select [SMB] from [Address Type].
Enter destination information, then tap [Register].
The registered information is the same as that to be registered from the Utility. For details, refer to [PC (SMB)] .
Tips- To check the settings for a registered destination, select its registered name, then tap [Check Job Setting].
- To change the settings for a registered destination, select its registered name, then tap [Edit].
- To delete a registered destination, select its registered name, then tap [Delete].
Related setting (for the administrator)- When you register a SMB destination in the single sign-on environment, a screen appears to prompt you to select whether to include the authentication information in the SMB destination registration information when logging in to this machine depending on the [Edit SMB User Credentials] setting. For details on the [Edit SMB User Credentials] setting, refer to [Client Settings] .
Reference- You can also register an SMB destination using Web Connection. For details, refer to [Registering an SMB Destination] .
Registering an FTP destination
Register destination FTP server host names or IP addresses. Also register a folder for saving a file or account information.
Tap [Address book] on the main menu.
Tap [New].
Select [FTP] from [Address Type].
Enter destination information, then tap [Register].
The registered information is the same as that to be registered from the Utility. For details, refer to [FTP] .
Tips- To check the settings for a registered destination, select its registered name, then tap [Check Job Setting].
- To change the settings for a registered destination, select its registered name, then tap [Edit].
- To delete a registered destination, select its registered name, then tap [Delete].
Reference- You can also register an FTP destination using Web Connection. For details, refer to [Registering an FTP Destination] .
Registering a WebDAV destination
Register destination WebDAV server host names or IP addresses. Also register a folder for saving a file or account information.
Tap [Address book] on the main menu.
Tap [New].
Select [WebDAV] from [Address Type].
Enter destination information, then tap [Register].
The registered information is the same as that to be registered from the Utility. For details, refer to [WebDAV] .
Tips- To check the settings for a registered destination, select its registered name, then tap [Check Job Setting].
- To change the settings for a registered destination, select its registered name, then tap [Edit].
- To delete a registered destination, select its registered name, then tap [Delete].
Reference- You can also register a WebDAV destination using Web Connection. For details, refer to [Registering a WebDAV Destination] .
Registering a User Box destination
Register user boxes to save.
The Hard Disk is optional in some areas. To use this function, the optional Hard Disk is required.
Tap [Address book] on the main menu.
Tap [New].
Select [User Box] from [Address Type].
Enter destination information, then tap [Register].
The registered information is the same as that to be registered from the Utility. For details, refer to [User Box] .
Tips- To check the settings for a registered destination, select its registered name, then tap [Check Job Setting].
- To change the settings for a registered destination, select its registered name, then tap [Edit].
- To delete a registered destination, select its registered name, then tap [Delete].
Reference- You can also register a User Box destination using Web Connection. For details, refer to [Registering a User Box] .
Registering from the Fax/Scan basic screen
Registering an E-mail address
Register destination E-mail addresses.
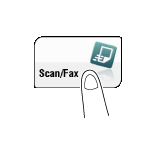
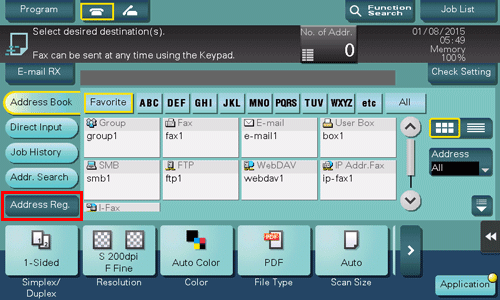
Tap [Scan/Fax].
Tap [Address Reg.].
Tap [New].
Select [E-mail] from [Address Type].
Enter destination information, then tap [Register].
The registered information is the same as that to be registered from the Utility. For details, refer to [E-Mail] .
Tips- You can check, change or delete the settings for a registered destination from the Utility. For details, refer to [E-Mail] .
Reference- You can also register an E-mail address using Web Connection. For details, refer to [Registering E-mail Address] .
Registering an SMB destination
Register a destination computer name (host name) or IP address. Also register a folder for saving a file or information for accessing a folder.
Tap [Scan/Fax].
Tap [Address Reg.].
Tap [New].
Select [SMB] from [Address Type].
Enter destination information, then tap [Register].
The registered information is the same as that to be registered from the Utility. For details, refer to [PC (SMB)] .
Tips- You can check, change or delete the settings for a registered destination from the Utility. For details, refer to [PC (SMB)] .
Related setting (for the administrator)- When you register a SMB destination in the single sign-on environment, a screen appears to prompt you to select whether to include the authentication information in the SMB destination registration information when logging in to this machine depending on the [Edit SMB User Credentials] setting. For details on the [Edit SMB User Credentials] setting, refer to [Client Settings] .
Reference- You can also register an SMB destination using Web Connection. For details, refer to [Registering an SMB Destination] .
Registering an FTP destination
Register destination FTP server host names or IP addresses. Also register a folder for saving a file or account information.
Tap [Scan/Fax].
Tap [Address Reg.].
Tap [New].
Select [FTP] from [Address Type].
Enter destination information, then tap [Register].
The registered information is the same as that to be registered from the Utility. For details, refer to [FTP] .
Tips- You can check, change or delete the settings for a registered destination from the Utility. For details, refer to [FTP] .
Reference- You can also register an FTP destination using Web Connection. For details, refer to [Registering an FTP Destination] .
Registering a WebDAV destination
Register destination WebDAV server host names or IP addresses. Also register a folder for saving a file or account information.
Tap [Scan/Fax].
Tap [Address Reg.].
Tap [New].
Select [WebDAV] from [Address Type].
Enter destination information, then tap [Register].
The registered information is the same as that to be registered from the Utility. For details, refer to [WebDAV] .
Tips- You can check, change or delete the settings for a registered destination from the Utility. For details, refer to [WebDAV] .
Reference- You can also register a WebDAV destination using Web Connection. For details, refer to [Registering a WebDAV Destination] .
Registering a User Box destination
Register user boxes to save.
Register a User Box before registering its destination. For details, refer to [Create User Box] .
The Hard Disk is optional in some areas. To use this function, the optional Hard Disk is required.
Tap [Scan/Fax].
Tap [Address Reg.].
Tap [New].
Select [User Box] from [Address Type].
Enter destination information, then tap [Register].
The registered information is the same as that to be registered from the Utility. For details, refer to [User Box] .
Tips- You can check, change or delete the settings for a registered destination from the Utility. For details, refer to [User Box] .
Reference- You can also register a User Box destination using Web Connection. For details, refer to [Registering a User Box] .
Registering Directly Entered Destinations in Address Book
Tap [Scan/Fax].
Tap [Direct Input], select the destination type, and then enter a destination.

After entering the destination, tap [Address Reg.].

Tap a destination you want to register with the address book.
 Tapping [New] allows you to register a new address, which is not yet entered. For details on how to register, refer to [Registering from the Fax/Scan basic screen ] .
Enter the registration name for the destination.
Add additional search text or enter a sort character as necessary.Settings
Description
[Address Type]
The destination type selected in the Direct Input is displayed.
[No.]
Destination registration number. [No.] is automatically registered using an unused smaller number. If you want to specify a number, tap [No.], then enter the number.
[Name]
Enter the destination name to be displayed on the Touch Panel (using up to 24 characters).
[Sort Character]
Enter the same name as the registered (using up to 24 characters).
You can sort destinations by registration name.
[Index]
Select a corresponding character so that the destination can be index-searched by registration name.
- For a frequently used destination, also select [Favorite]. If [Favorite] is selected, the destination will appear in the main screen of the fax/scan mode, enabling the user to easily select a destination.
Destination Information
The destination that is specified by direct input is displayed.
Tap [New], then [Close].
When a fax transmission to the destination which is specified by direct input is complete, tap [Address Book] and check that the destination is registered.
Related setting (for the administrator)- When you register a SMB destination in the single sign-on environment, a screen appears to prompt you to select whether to include the authentication information in the SMB destination registration information when logging in to this machine depending on the [Edit SMB User Credentials] setting. For details on the [Edit SMB User Credentials] setting, refer to [Client Settings] .
Registering from Transmission Log
Tap [Scan/Fax].
Tap [Address Reg.].
Tap [Register from history].

Tap a destination you want to register with the address book.
Enter the registration name for the destination.
Add additional search text or enter a sort character as necessary.Settings
Description
[Address Type]
The destination type selected from the transmission log is displayed.
[No.]
Destination registration number. [No.] is automatically registered using an unused smaller number. If you want to specify a number, tap [No.], then enter the number.
[Name]
Enter the destination name to be displayed on the Touch Panel (using up to 24 characters).
[Sort Character]
Enter the same name as the registered (using up to 24 characters).
You can sort destinations by registration name.
[Index]
Select a corresponding character so that the destination can be index-searched by registration name.
- For a frequently used destination, also select [Favorite]. If [Favorite] is selected, the destination will appear in the main screen of the fax/scan mode, enabling the user to easily select a destination.
Destination Information
The information on the destination selected from the transmission log is displayed.
Tap [Register], then [Close].